
DreamWeaver Basics
Introduction:
Making a web page isn't as hard as it used to be. In the early days (the late '90s), if you wanted to create a web page you had to write it using HTML (HyperText Markup Language) code. This is a programming language that handles the way content is formatted on the web, much like early word processors used to do with control codes for italics, underlining, bold, color, font style and size. For an example of HTML code, go to any web page in your browser and choose View Source. Yikes! Nowadays, a quick and dirty solution is to take a Microsoft Word document and choose Save As HTML, but Word creates really messy code. Although this is ok in a pinch, the files will be bigger and slower to load and they will usually only look good in Internet Explorer. Using an HTML editor like DreamWeaver is a better choice if you need to build standard, clean, and complex web pages. You can still look at the source code if you want to, but you can also work in "design view" and let the program write the code. Because the editor is WYSIWYG (what you see is what you get), your content in design view looks (mostly) the way it will when you view it through a browser. Much more civilized.
Files and Folders:
When you use Microsoft Word, images are embedded in the document and it is all saved as a single file. With a web page, the text is in the .htm file, but the graphic elements are located in separate files. This is because, in the early days of the web, data transfer rates were so slow that the images, which are large, took a long time to load. Therefore, the text of the page was designed to load immediately, giving you something to read while waiting for the images to be drawn. The .htm file has pointers to the image files, which are usually found in an images subfolder. Today things load so much faster that most people wouldn't notice, but the internal architecture of a web page has not changed much.
Naming Conventions:
Naming files and folders can get you into trouble. Stick to basics with filenames to avoid problems and make the path easier to remember. 1) No "funny" characters (!@#$%^&*();:) in your filenames, 2) It is best to avoid CAPITAL letters, 3) Use_underscore_instead_of_spaces_between_words, 4) HTML files end with the three letter extension .htm and image files end in .gif, .jpg, or .png and that should be the only dot in the filename. 5) All of your web files must be in a single folder for best results (but within that folder, you can create subfolders for organization). 6) By convention, the main page in a folder should be named "index.htm." This will allow the page to be loaded automatically without its name being specified. Just be careful not to overwrite one index file with a different one. This is a quick way to blow away your website!
Note: If there is no file named index.htm then a user who types the path to the folder will be presented with a list of the contents of that folder.
Part 1 - Setup
DreamWeaver is a complex program and you will still be discovering tricks after years of using it. Don't worry, you can ignore a lot of it and still get things done. First we need to set it up so you can work efficiently. There are two ways to edit content. You can either edit the web pages live on the server (see step 5 below) or you can edit a local copy and upload those changes periodically (steps 2 - 4 below). We recommend the latter method because it is both faster and safer than making changes directly on the remote server. This is also the method you will need to use when working with a Course Management System like Bb Vista.
1. Open the DreamWeaver application by double-clicking its icon. ![]()
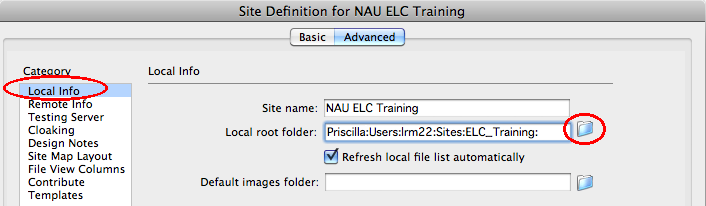
2. In the Site menu, choose New Site... and click the Advanced tab. In the left sidebar, select the Local Info category. Click on the folder icon to the right of the Local Root Folder textbox and browse to the place where you want to keep a local copy of your web content.
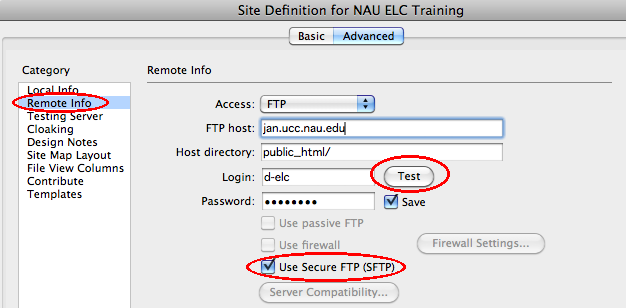
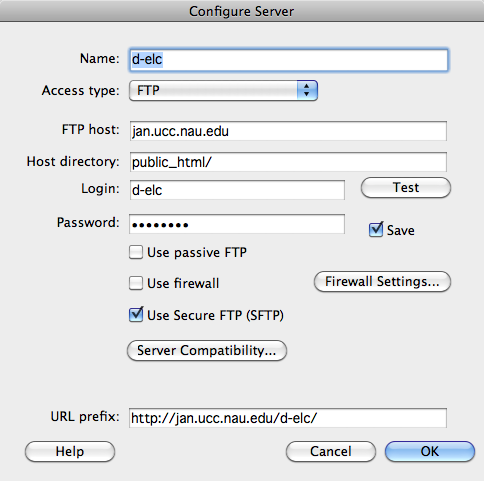
3. Next select the Remote Info category and enter the information to connect to the web server where your pages will be hosted. For content on NAU's JAN server, you will use Secure FTP (file transfer protocol) and it should look something like this. For content on Bb Vista, you will make a WebDAV connection following these instructions. Click the Test button to see if you can make a connection to the server. You can get back to the setup information in the Site/Manage Sites... menu.
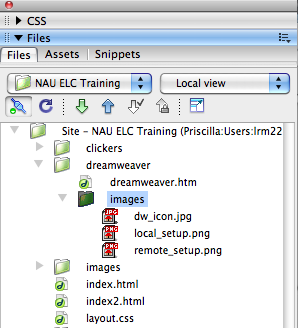
4. In the Window menu, select Files and a window appears on the right. Now, whenever you make a change to a local file or folder, just highlight it in the list and click the ![]() Put Files button to upload it to your website. Use the
Put Files button to upload it to your website. Use the ![]() Get Files button to download current copies of all files to your local folder. To visually compare what is on your local machine with what is on the remote site, click the
Get Files button to download current copies of all files to your local folder. To visually compare what is on your local machine with what is on the remote site, click the ![]() Expand button. To update your list, click the
Expand button. To update your list, click the ![]() Refresh button.
Refresh button.
Really Important Note: Be careful! When you use ![]() Get and
Get and ![]() Put, you must always start with the most current version of your content or you can overwrite your work. If the most current version of the project is on your local machine, you should start by doing a Put to the server. If the most current version is on the server, you should start by doing a Get of the files. If in doubt, get from the server since this is the published version. Also, be very careful about what folder or file is selected when you initiate a Get or Put. In the example above, the images folder is selected so a Get will download the images folder (and all of its contents). A Put will upload this version of the images folder to the server, wiping the version that was on the server.
Put, you must always start with the most current version of your content or you can overwrite your work. If the most current version of the project is on your local machine, you should start by doing a Put to the server. If the most current version is on the server, you should start by doing a Get of the files. If in doubt, get from the server since this is the published version. Also, be very careful about what folder or file is selected when you initiate a Get or Put. In the example above, the images folder is selected so a Get will download the images folder (and all of its contents). A Put will upload this version of the images folder to the server, wiping the version that was on the server.
5. If you decide that Get and Put are too much trouble, you can try live editing of your pages. From the menu, choose Site/Manage Sites, select the New... button and choose FTP Server from the pulldown menu. In this case, the only copy is the one you are working on. If you break it, there's nothing to do but fix it. Some people do make a backup copy of the index file however, and work on that until it looks good.
6. From the View menu, select Code and Design, also called the ![]() Split view, which lets you simultaneously see the HTML code in the upper window and the page design in the lower window.
Split view, which lets you simultaneously see the HTML code in the upper window and the page design in the lower window.
7. Finally, from the Window menu, select Properties so that the formatting toolbar appears at the bottom of the screen.

Tip: Viewing the HTML source code of a nicely put together page is a good way to learn new tricks. In your browser, select View Source. You can also copy and paste the source code into a blank DreamWeaver document and look at it in Design view.
Part 2 - Text
1. Type a title for your web page. (Example: "Welcome to My Web
Page!") Highlight the text and then, in the Properties toolbar at the bottom of the screen, choose Format ![]() . Use the Headings rather than adjusting text properties individually. For example, titles can be H1, subtitles can be H2, etc.
. Use the Headings rather than adjusting text properties individually. For example, titles can be H1, subtitles can be H2, etc.
2. To change the page title that appears in the web page's window bar, edit the name in the title box ![]() in the upper toolbar.
in the upper toolbar.
3. You can use the alignment buttons in the Properties toolbar to ![]() center your text. You can also align text to the
center your text. You can also align text to the ![]() left or
left or ![]() right.
right.
4. Within paragraphs, use ![]() to make it bold, or
to make it bold, or ![]() to italicize it. Additional formatting options are under the Text/Style menu.
to italicize it. Additional formatting options are under the Text/Style menu.
5. To change the color of the text, choose the ![]() text color box from the Properties toolbar.
text color box from the Properties toolbar.
6. You can ![]() indent or
indent or ![]() outdent (is that a word?) your text.
outdent (is that a word?) your text.
7. To add a horizontal divider, select Insert/HTML/Horizontal Rule.
8. To make a list, click for either a ![]() bullet list or a
bullet list or a ![]() numbered list, following each item
with a "Return", or simply highlight a list of items you have
already typed and click the desired list button.
numbered list, following each item
with a "Return", or simply highlight a list of items you have
already typed and click the desired list button.
Part 3 - Tables
1. Tables should be used for the presentation of data but not for page layout because this creates difficulties for screen readers.
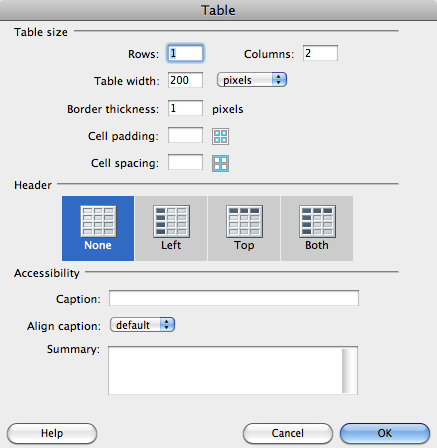
2. To make a table, put the cursor where you want the table to appear and select Insert/Table. Specify how many rows and columns you will need. If you're not sure, you can change it later.
3. Adjust Border Thickness, Padding, Spacing as desired. Note that a border thickness of 0 will make the table invisible.
4. Use a Header row and/or column when labels are necessary.
5. Use the Caption and Summary boxes to describe the content of the table for the visually disabled.
Part 4 - HyperText Links
A hypertext link is a piece of clickable text. When you click on it, you will jump to someplace else. Where? It could be a "mail-to" link that opens your e-mail program, or an "http" (hyper-text transfer protocol) link that takes you to another web page, an ftp (file transfer protocol) link that starts a file download, or a local link to another web page at your site. It could even be an anchor, which jumps you to a different part of the same page.
1. To make a link to a page, highlight the text that will become the link and
then type the web address into the Link textbox ![]() in the Properties toolbar. If you want the link to open a new window, set the Target to " _blank"
in the Properties toolbar. If you want the link to open a new window, set the Target to " _blank" ![]() using the pulldown menu. By convention, use the "open in a new window" option when you link to pages outside your site.
using the pulldown menu. By convention, use the "open in a new window" option when you link to pages outside your site.
2. If you want to link to another page within your website, click the ![]() point to file button and drag the arrow to the file you want in the Files window, or click the
point to file button and drag the arrow to the file you want in the Files window, or click the ![]() folder icon to browse to file.
folder icon to browse to file.
3. A "mailto:" link, when clicked, opens a new message in your email client and addresses the message to the recipient. Highlight the text that will become the link and type "mailto:email@address" in the Link textbox. This link will send me a message. Click to see how it works.
4. Sometimes, you may want to use a Named Anchor link to jump the user to a different location on the same page. Making an anchor requires two steps:
a) First, position the cursor where you want the user to "land," and select Insert/Named Anchor from the menu. An
anchor icon will appear. You will be prompted to give the anchor a name (Note: Names are CaSe SeNsitive).
b) Go to the location where the person will "take off" and highlight some text. In the Link textbox, type the pound sign (#) followed by the AnchorName. In this example, the anchor will jump you to the top of the page.
Part 5 - Graphics
Small images can be inserted inline with text. Larger images can sit on a line all by themselves. Where it gets tricky is when you want to wrap text around graphics or position something so it stays put relative to a block of text. For that you will need to insert a Layout Object such as a DIV tag (see Part 6 below). Images you will use in your web page are usually included in an images folder associated with that page.
1. Position your cursor where you want the image to appear. Select Insert/Image to add a graphic. Browse for the graphic file, select it, and you will be prompted for Accessibility information.
2. At a minimum, provide some Alternate text. The ALT tag provides a brief text caption for an image which tells blind users what the image represents. If the image requires a more detailed description, you can use the LONGDESC attribute.

3. Click on the ![]() left,
left, ![]() center, or
center, or ![]() right positioning tool to position the graphic.
right positioning tool to position the graphic.
Tip: You can grab a picture from the Internet by right-clicking on it and saving it to your images folder.
Part 6 - Layout and CSS
Complex page layout requires the use of layout tags like DIV and SPAN and the use of CSS (cascading style sheets). The DreamWeaver icon at right is coded with a div tag, which allows the text to wrap around it. Here's the code that does it:
<div id="figure" style="float: right; width: 5%;"><img src="images/dw_icon.jpg" style="float: right; width: 100%;" alt="DreamWeaver icon" /></div>The DIV tag creates a box, floated from the right side of the window, with a scaling width of five percent. Inside the DIV box is a graphic scaled to take up 100% of the space inside the box.
Part 7 - Preview in Browser
What will it look like when you're done? Click on the ![]() preview/debug in
browser button to see what your page will look like to someone using a web
browser, since what you see in
DreamWeaver may not be exactly what you get in your browser. Things
will also look slightly different depending on which browser
you are using. It's a good idea to test
your pages on both Macs and Windows computers with several browsers.
preview/debug in
browser button to see what your page will look like to someone using a web
browser, since what you see in
DreamWeaver may not be exactly what you get in your browser. Things
will also look slightly different depending on which browser
you are using. It's a good idea to test
your pages on both Macs and Windows computers with several browsers.