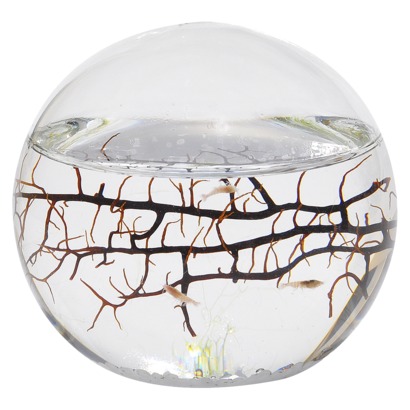
Introduction: There's only one stable, long-lasting biosphere that we know of. It's the Earth. It shouldn't surprise you that human attempts to create sealed systems don't generally fare very well. The International Space Station, despite efforts to recycle everything possible (including converting urine to drinkable water--do you still want to be an astronaut?) to reduce costs, couldn't sustain life for long without a steady supply of provisions from, and garbage hauling back to, Earth. You know they try hard because, if all goes as planned, it costs about $10,000 to put a pound of payload (supplies) into Earth orbit. The BioSphere 2 project in Southern Arizona was an interesting and costly effort, but the original studies weren't very scientific and it proved quite difficult to keep just a handful of humans alive for a relatively short period of time. You can buy tiny sealed marine ecosystems enclosed in glass. They are beautiful curiosities, but the one I bought for my wife lasted less than a year before crashing. Among the crazier justifications for space exploration is that when (note the assumption of inevitability) we ruin the Earth, we will need new places to live (and, presumably, ruin). Unless or until we can do a lot better at building self-contained ecosystems, it would be a far better use of human effort to focus on preserving the only one we've got. Not only that but, if we make the Earth uninhabitable, I'm not sure we deserve to live somewhere else. But the challenge itself is interesting, and the scientific questions you can ask in the process of understanding, building, and trying to maintain such a system are valid. We're going to give it a try. Good luck! There's a Nobel Prize in it.
marine shrimp ecosphere
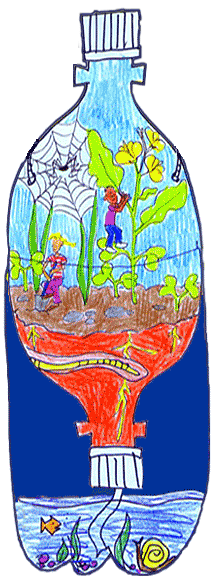
The Basic Theory: In a closed system, like the one in your bottle, you will need to establish an ecological balance in order for all of your organisms to survive and reproduce. The selection of which organisms to use, and how many to begin with, is important, because, for example, if you have too many animals consuming oxygen and not enough plants producing it, the animals will die. If you have too many plants and not enough animals that eat them, the plants may become overcrowded and die. Plants take carbon dioxide (CO2) out of the air and, by a process called photosynthesis, use the energy from sunlight to take those carbons and string them together to make sugars (plant food), releasing the oxygen (O2) as a waste product. Animals use oxygen as part of the process of metabolism (releasing energy from food). Plants and animals are therefore mutualistic; in the right balance, they help each other survive because they each produce what the other needs, and they each use up what the other doesn't need. (Now it's actually a bit more complicated, because plants only produce oxygen when they have light, and they consume oxygen in the dark.) Plants also absorb chemical nutrients like nitrogen (proteins are mostly made of nitrogen and carbon, so dead animals enrich the soil for the plants), phosphorus, and potassium from the soil through their roots. Animals consume the plants (or other animals) and produce wastes that bacteria break down into the nutrients the plants can reuse. Water is consumed by both plants and animals, but is also excreted, purified, and reused. When plants and animals die, they are broken down by decomposer organisms like bacteria and fungi, and the chemicals that were part of their bodies are recycled back into new living things. The only inputs from outside are heat and light, and the whole system should be able to recycle everything else and be self-sustaining across many generations. The earth is a self-sustaining ecosystem that has lasted for billions of years.
This is a project I'd like you to start at the beginning of the semester, so that you can make weekly observations throughout the semester. But there's a catch: Once you seal it up, you can't mess with it anymore. The only allowed inputs to the system are heat and light. To get started, read on...
There's a lot to cover here. Let's start with materials. You will need three or four 2-liter soda bottles. Possibly more if you make mistakes :-) I'd like you to build something similar to the "TerrAqua" column at the Bottle Biology site, or the Building an Eco-Column PDF, but you're going to completely seal it up. No air holes or other inputs except light and heat. You can use either non-toxic silicone sealant (smells like vinegar while drying, takes about 24 hours to fully cure) or duct tape to seal your bottles. We're trying to create a self-sustaining ecosystem that will last a while. Getting things in balance is very tricky, but it can be done.


There are many ways to build your biosphere. The steps above, lettered A-H, using bottles numbered 1-4, will give you the basic idea, but you can expand upon, or deviate from, this design if you want. Step A is the cut for bottle 1, the bottom section, which will contain the aquatic organisms. Step B is the cut for bottle 2, which will form the roof of the aquatic habitat and the connection to the upper chamber. Step C is an assembly step that joins bottle 1 to bottle 2. Step D is the cut of bottle 3, for the walls of the land section. Steps E and F are assembly steps to join bottle 3 to bottles 1 and 2. Step G is the cut of the 4th bottle, which will form the roof of the upper chamber. If you have more bottles, you could keep building upward. The bottle shown in the photographs below has 3 chambers, including one aquatic section and two different land chambers. Note that there should be an opening between all sections so that air and moisture can move throughout the entire bottle complex. However, keeping the cap on top of the aquatic section temporarily while you load the soil, land plants, earthworms, etc., will prevent you from spilling things into the lower section. Just be sure to remove the cap over the aquatic section when you're done with the land habitat. Step H is the completed, 2 chamber bottle biosphere.


